Showing posts with label Cross Country Blog Hop. Show all posts

Friday, August 10, 2018

Cross Canada Blog Hop - Documented

Welcome to our Cross Canada Blog Hop featuring artwork created using the Documented collection. To purchase any of the items seen in our blog hop today, contact your local consultant to place an order. Or me 😝

We hope that you will take the time to leave comments on our posts, as we love to get feedback from our viewers....whether it was something that you really liked or some new technique that was used that you would like to learn how to do....by leaving us comments, we get to hear what you like, and what you want to see. Thank you… now on to our hop!

If you have just hopped onto my blog, you can start here as this is a circular hop, but if you want to follow us across Canada then please start at the beginning and join Michelle. If you came from Brandi's Crzy4scrapbooking then you are in the right place!

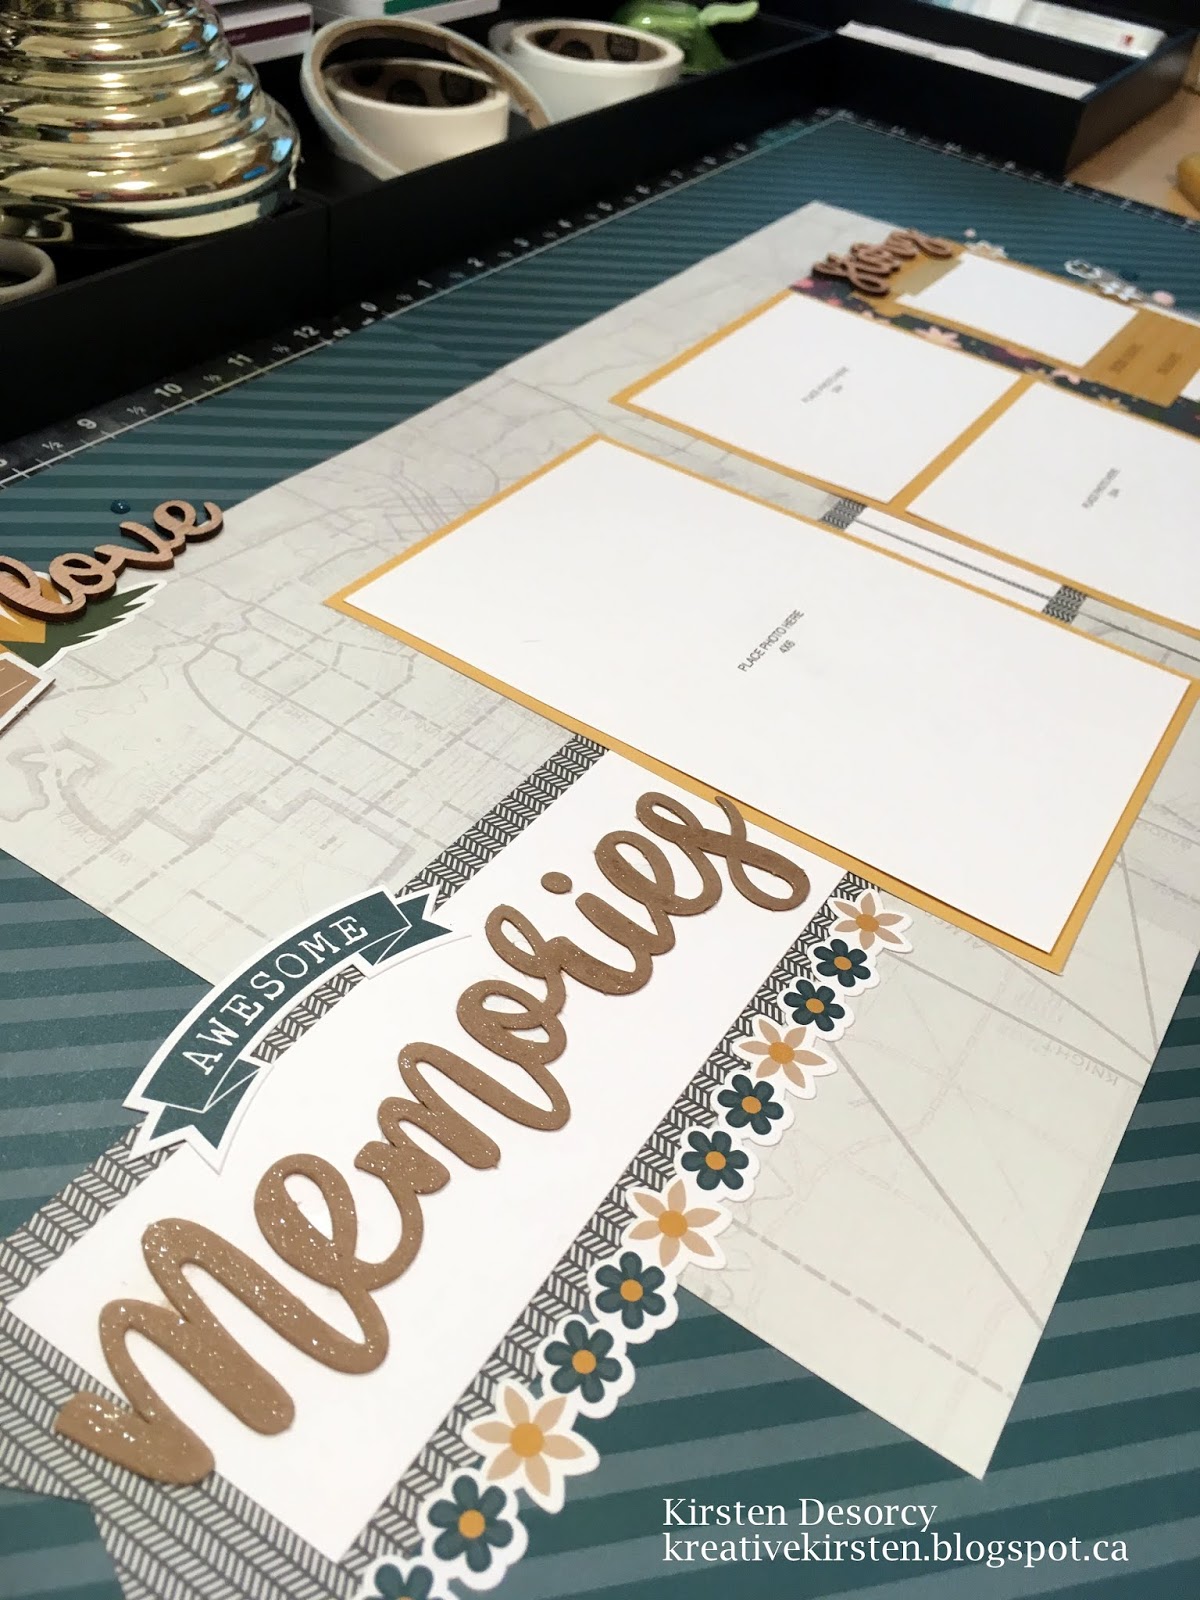
Welcome to my Documented Workshop! This workshop uses the Documented Workshop Your Way. It makes the original WYW artwork (Although I did swap some papers around). Plus uses up the scraps and a bit of additional cardstock to create 2 additional 2 page layouts! You can purchase the guide for this using the "Workshops" tab above.


I already had fun adding photos and fun interactive pieces to the first two layouts. Check it out.

 For this one I added a pocket plus page plus TWO flip flaps. Yes I definitely took too many photos on our trip lol.

And some photos to layout #2


Supply List:
Documented paper pack
Documented Dots
Documented Complements
Flip Flaps
Pocket Plus Pages

Your next stop on the Cross Canada Hop is Terry Ann of Just a TAD Crafty.
If you get lost along the way, you can head to Michelle S Blog, as she has the complete blog list.

Thanks for hopping along with us - we hope we were able to inspire you to get creative using some of the designs, products and techniques seen along the way. We hope you will join us again next month when we will be featuring artwork using Boutique collection. So mark September 10th on your calendars and hop along with us.

Sunday, July 15, 2018

Cross Canada Hop - Central Park

Welcome to our Cross Canada Blog Hop featuring artwork created using the Central Park collection. To purchase any of the items seen in our blog hop today, contact your local consultant to place an order. Or me 😝

We hope that you will take the time to leave comments on our posts, as we love to get feedback from our viewers....whether it was something that you really liked or some new technique that was used that you would like to learn how to do....by leaving us comments, we get to hear what you like, and what you want to see. Thank you… now on to our hop!

If you have just hopped onto my blog, you can start here as this is a circular hop, but if you want to follow us across Canada then please start at the beginning and join Michelle. If you came from Brandi's Crzy4scrapbooking then you are in the right place!

So, I just got back from CTMH's annual convention a couple weeks ago in Las Vegas, Nevada. You are just going to LOVE the new products that will be released September 1st! I'm so excited to start creating! A topic for another time. Anyways, here is the layout I created for the layout challenge:


The background was created by "stamping" an empty water bottle in a few different shades of blue ink (I forgot which ones 😳) and then onto the cardstock until the ink ran out. Then I squeezed some ink onto the lid and used water and the ink to paint the edges. I love the way it turned out! I cut the "Create" from uploading the image into design space. This is one of the patterns in the Central Park collection. "Memories" is from the Central Park alphabet stickers. The journaling space is a Picture My Life card trimmed down. I made the bathtub in design space using the You Are Here cartridge. Central Park sequins were the perfect embellishments to make bubbles.

Supply List:
Central Park paper pack
Central Park complements
Central Park Sequins
Central Park Alphabet
White Daisy, Pacifica, Linen, Goldrush, Poppy, Willow, Canary & Black cardstock
Sapphire, Peacock, & Pacifica ink
Flip Flaps 
Journaling Pen

Your next stop on the Cross Canada Hop is Terry Ann of Just a TAD Crafty.
If you get lost along the way, you can head to Michelle S Blog, as she has the complete blog list.

Thanks for hopping along with us - we hope we were able to inspire you to get creative using some of the designs, products and techniques seen along the way. We hope you will join us again next month when we will be featuring artwork using Documented collection. So mark August 10th on your calendars and hop along with us.

Friday, April 15, 2016

Cross Canada Blog Hop - Spring is in the Air

Hello and welcome to the Cross Canada Blog Hop. This week we will be featuring Spring is in the Air.

If you have just joined us you can start here and continue on, as this is a circular hop or if you get lost along the way you can start at the beginning with Michelle's Blog as she has the complete list. If you came here from DAT'S MY STYLE you are in the right place. Now on to my project:

So for my Spring pages I decided to do the Penelope Workshop Your Way kit, changing it up a little bit to suit my pictures and liking.


And after all that I still had enough scraps and supplies to do this layout of Easter Morning and will probably have enough for another 2 page layout, possibly more. I just LOVE how much paper is included in these new kits! If you don't want to miss out on this beautiful springy paper pack make sure you buy before April 30th!


Supply List:
Penelope paper pack
Penelope Complements
Limeade Washi Tape
Playful Puffies
Ink Blot Stamp Set
Thistle Twine
Thistle & White Daisy Cardstock
Thistle, Pixie & Canary Ink
Journaling Pen   

Thank you for checking out my project. If you would like to place an order for any of these supplies you can buy them here. If you enjoyed my project please comment below as we love feedback! Next on our blog hop is Janet from Works of Heart. Make sure to check out her amazing work featuring this same product.
 

Have a great day!

Wednesday, March 16, 2016

Cross Canada Blog Hop - Easter Creations

Hello and welcome to the Cross Canada Blog Hop. This week we will be featuring Easter Creations.

If you have just joined us you can start here and continue on, as this is a circular hop or if you get lost along the way you can start at the beginning with Michelle's Blog as she has the complete list. If you came here from SCRAPBOOKING WITH CHERYL you are in the right place. Now on to my project:

Okay so I know it was early in the month but I couldn't help myself and did a little Easter Photo Shoot with my little girls. It is my youngster's first Easter. Then I paired the pictures with the Penelope Paper pack and created this fun and interactive layout.


The eggs were embossed using our embossing folders and inking the inside before running it through the Big Shot. And for the interactive aspect as you can tell I made TWO sliding window elements and one flap. This is how I made the sliding windows by using cardstock and 3D tape: 


I made sure to add stoppers so that it didn't slide all the way out. I also made a slit in my page protectors so that I can open and shut the windows with ease. Reminder: Make sure to add holes at the end of the slits so that they don't tear.


For the flap I created it using our White & Gold ribbon and gluing it in between the pieces of cardstock on the flap and under the piece on the layout. Then I cut a slit in the Memory Protector again for the flap to go through. Then I took a 4x6 Flip Flap and cut off the adhesive part and just slid my flap in there and it was simple and all my pages and photos are well protected and easy to access!


I know this is a lot lol but if you have any questions just ask and I'll reply ASAP! Thanks!

Supply List:
Penelope Paper Pack
Penelope Complements
Junebug Puffies (While Supplies Last)
White Daisy & Thistle Cardstock
Pixie, Thistle, Pear & Honey Ink
Ink Blot Stamp Set
4x6 Flip Flap
Piercing Tool
Heart, Stripe & Floral Embossing Folders
White & Gold Ribbon
Artistry Cricut Cartridge
3D foam tape 

Thank you for checking out my project. If you would like to place an order for any of these supplies you can buy them here. If you enjoyed my project please comment below as we love feedback! Next on our blog hop is Janet from JAN'S WORKS OF HEART. Make sure to check out her amazing work featuring this same product.

See you on April 15th as we will be featuring Spring is in the Air! Have a great day!

Monday, February 15, 2016

Cross Canada Blog Hop - Cardstock Creations

Hello and welcome to our Cross Canada Blog Hop. This week we are featuring Cardstock Creations.

If you have just joined us you can start here and continue on across Canada, as this is a circular hop or if you get lost along the way you can start at the beginning with Michelle's Blog as she has the complete list. If you came here from CANADIAN SCRAPPERS you are in the right place. Now on to my project:

So my daughter had her birthday party earlier this month and I had prepared her layouts all ready for the photos. She had a Curious George Birthday Party and I had showcased the invitations I had made HERE for the SOTM Blog Hop, as well as an additional layout for her birthday cake and a "guestbook". Check it out by going over to that link. I still haven't printed them out yet but here is the layout I made using just cardstock and my Cricut.


And here is a banner I made for decoration behind the table :) I used retired cardstock colors and retired ribbon. Might as well use it for something ;)


EDIT: Added Photos ;)


Supply List:
Yellow Retired Cardstock (forgot the name)
Ruby Cardstock
Colonial White Cardstock
Saddle Cardstock
Brown Shinwan Marker
Pearl Gems
Canary Distressing Ink
Artistry Cricut Cartridge
Artbooking Cricut Cartridge
Cranberry Bakers Twine (While Supplies Last)
Journaling Pen  

Thank you for checking out my project. If you would like to place an order for any of these supplies you can buy them here. If you enjoyed my project please comment below as we love feedback! Next on our blog hop is Janet from JAN'S WORKS OF ART. Make sure to check out her amazing work featuring this same product.

See you on March 15th as we will be featuring Easter Creations! Have a great day!

Friday, January 15, 2016

Cross Canada Blog Hop - Creating with Watercolor

Hello and welcome to CTMH's Cross Canada Blog Hop. This week we are featuring artwork created by using Watercolors.

If you have just joined us you can start here and continue on, as this is a circular hop or if you get lost along the way you can start at the beginning with Michelle's Blog as she has the complete list. If you came here from SCRAPBOOKING WITH CHERYL you are in the right place. Now on to my project:


I used the water paints to create this layout. On a cut sheet of watercolor cardstock I masked the areas I wanted to keep white with some washi tape and cut strips of cardstock. Then I painted using different colors and blending them together.


I wanted to try and match the colors of my daughter's hat and pajamas with the background. Then I took some of the blue that would match the play doh and sprinkled it in bunches where my photos would go. I did it by wetting my paintbrush a lot, picking up the blue paint and then taping my paintbrush against my finger to make it splatter. 

There are so many possibilities using the water paints, tips and techniques that can be explored. Try to think outside of the box!

Supply List
Lagoon Cardstock
Waterpaint Set
Paint Brush Set
Water Color Cardstock
Laughing Lola Assortment (Retired)
Additional Non-CTMH supplies: Alphabet & Wooden Buttons

Thank you for checking out my project. If you would like to place an order for any of these supplies you can buy them here. If you enjoyed my project please comment below as we love feedback! Next on our blog hop is Heather from INKY HUGS. Make sure to check out her amazing work featuring this same product.

See you on February 15 as we will be featuring Cardstock Creations! Have a great day!

Tuesday, December 15, 2015

December Cross Country Blog Hop - Where We Create

Welcome to our November Blog Hop featuring how Where We Create.To purchase any of the items seen in our blog hop today contact your local consultant to place an order.

We hope that you will take the time to leave comments on our posts, as we love to get feedback from our viewers... whether it was something that you really liked or some new technique that was used that you would like to learn how to do... by leaving us comments we get to hear what you like, and what you want to see. Thank you... now on to our hop!

If you have just hopped onto my blog, you can start here as this is a circular hop, but if you want to follow us across Canada then please start at the beginning and join Michelle at My Creations with Michelle. If you came from Carol of Crafty Carol then you are at the right place!

My creating area is quite small. We live in a small side-by-side apartment with two young kids so I had to set up a work station in my bedroom. Because of this I can't even shut my door! lol. You do what you got to do!


Your next stop on the Cross Canada Blog Hop is Janet of Works of the Heart.

If you get lost along the way you can head to Michelle's Blog, as she has the complete list.

Thanks for hopping along with us - we hope we were able to inspire you to get creative using some of the designs, products and techniques seen along the way. We hope you will join us again next month when we will feature Creating with Watercolors. So mark January 15 2015 on your calendars and hop along with us.

Sunday, November 15, 2015

November Cross Canada Blog Hop - Prepare for Christmas

Welcome to our November Blog Hop featuring how we Prepare for Christmas.To purchase any of the items seen in our blog hop today contact your local consultant to place an order.

We hope that you will take the time to leave comments on our posts, as we love to get feedback from our viewers... whether it was something that you really liked or some new technique that was used that you would like to learn how to do... by leaving us comments we get to hear what you like, and what you want to see. Thank you... now on to our hop!

If you have just hopped onto my blog, you can start here as this is a circular hop, but if you want to follow us across Canada then please start at the beginning and join Michelle at My Creations with Michelle. If you came from Donna of Dats My Style then you are at the right place!

Okay on to my project! To prepare for Christmas every year the first thing I do is set up my Christmas Tree (usually on November 1st). I absolutely love Christmas - the lights, the decorations, the food, the family, the movies, Jesus' story, the fellowship, the snow, the gifts, the coziest, the magic - EVERYTHING. Every Christmas in my house we have a tradition that every member of the family gets to choose an ornament that represents them for the year. My girls are still too young to choose so I chose for them. Also, if I go on a trip anywhere I always make sure to purchase an ornament. Then I take pictures of the ornaments and scrapbook them for that year. I just love preserving memories! It's nice to unwrap the ornaments every year and just REMEMBER.

This year is my daughter Aliyah's first Christmas and I wanted an ornament that says Baby's First Christmas that I could add a photo to. I couldn't really find one that was cheap that I liked so I decided to see if I could make one. I still have to add the photo.


To start off I cut out the shape on a cracker box cardboard piece using my Cricut and the Art Philosophy cartridge. Then I cut the same shape out on some Colonial White card stock. The on one piece I used the sponge to ink the piece with these ink colors: Cranberry, Honey and Fern - starting with the lightest color first. While that dried I cut out some circles of different sizes and used the outside piece as a stencil to ink White Daisy pigment ink over top of the colored inks. Make sure the colors are completely dry before doing this. I did a few layers of the circles, letting each layer completely dry before doing the next layer.

I cut another piece of cardboard and card stock pieces to do the Baby's 1st Noel. Then I wrote on there with our Embossing Pen and sprinkled it full of our Gold Embossing Powder. Make sure to shake off all the extra powder before heating. Using my craft heater I melted the embossing powder on both the title and ornament shape. Make sure to put a glue dot or something under the pieces before heating so it doesn't blow away.

Once everything was all dry I glued it all together using the glue dots and distressed the edges with my Cranberry mini pigment ink. Then I attached the Baker's Twine. I covered the entire ornament in Liquid Glass to make it a bit more sturdy and give it a nice shine. Liquid Glass makes a good adhesive too.


I want to hear from you. What are your Christmas Tree traditions?

Supplies: all supplies used can be purchased here.
Cricut Art Philosophy = 117.75$
Inks (Cranberry, Fern, Honey) = 8.25$
White Daisy Pigment Ink = 9.95$
Card stock (Cranberry, Colonial White) - pack of 24 = 17.25$
Cranberry mini pigment ink (part of Adventure set) = 23.75$
Sponge = 1.50$
Glue Dots = 8.95$
Liquid Glass = 8.25$
All-Purpose Mat = 23.75$
Embossing Pen = discontinued
Princess Gold Embossing Powder = 6.95$
Craft Heater = 41.50$
Cranberry Baker's Twine = discontinued

Your next stop on the Cross Canada Blog Hop is Janet of Works of the Heart.

If you get lost along the way you can head to Michelle's Blog, as she has the complete list.

Thanks for hopping along with us - we hope we were able to inspire you to get creative using some of the designs, products and techniques seen along the way. We hope you will join us again next month when we will feature Where we Create. So mark December 15 2015 on your calendars and hop along with us.